The File Failed to Upload. Laravel Larger

File upload is an essential aspect of whatever project. Given this importance, it is surprising that many developers face challenges of calculation file upload feature to their projects. In particular, developers are unsure about how to upload and validate files.
In this tutorial, I volition discuss how to implement Laravel file upload functionality with multiple file and paradigm uploading option. I will use the Laravel storage binder and and then create database record for uploading files. I will utilise Laravel 5.5 and Bootstrap to power the lawmaking of this tutorial.
- Prerequisites
- Create Model with Migration
- Item Model
- Create the Migration
- Model Of ItemDetails
- Migration of ItemDetails Table
- Database Configuration
- Prepare the Road
- Create the Controller
- View File (Upload_form.bract.php)
- Controller with Validation
- Storing Data and Files in Laravel
- With Validation
- Departure Betwixt Local and Public Disks
- Manipulating files
- Sending Files equally Electronic mail Attachments
- Create email sender class
- Create the email template
You might besides like: PHP File Upload with jQuery AJAX
Prerequisites
For the purpose of this tutorial, I assume that you lot take a Laravel application installed on a web server. My setup is:
- Linux/Unix or WAMP/XAMPP environment
- Laravel 5.v
- PHP 7.one
- MySQL
- Spider web server (Apache, NGINX or integrated PHP web server for testing)
I have installed a Laravel app on a Cloudways managed Laravel server because information technology has everything I'll need for this tutorial. If you do not have an account on Cloudways, sign upward for free, and check out the following GIF to setup the server and application in just a few clicks.
Create Model with Migration
I will start by creating the model and the tables in which I will relieve the files.
Launch the SSH concluding, become to the application's public root folder and blazon following commands:
php artisan make:model Item -g php artisan make:model ItemDetails -thousand
Particular Model
When the migration and the model have been created successfully, go to app/Item.php and add the post-obit Model code to it:
<?php namespace App; use Illuminate\Database\Eloquent\Model; grade Particular extends Model { protected $fillable = ['proper name']; } Create the Migration
Go to the database/migration folder and open up the migration file for item. You will encounter the default structure that include (in my case) id , name, timestamps.
<?php utilise Illuminate\Support\Facades\Schema; use Illuminate\Database\Schema\Pattern; use Illuminate\Database\Migrations\Migration; grade CreateItemsTable extends Migration { public function up() { Schema::create('items', function (Blueprint $tabular array) { $tabular array->increments('id'); $table->cord('proper name'); $table->timestamps(); }); } public function down() { Schema::drop('items'); } }?> Model Of ItemDetails
The model comprises of the following lawmaking:
<?php namespace App; use Illuminate\Database\Eloquent\Model; course ItemDetail extends Model { protected $fillable = ['item_id', 'filename']; public function item() { return $this->belongsTo('App\Detail'); } } ?> In the above code, I used belongTO because itemDetails belongs to Item tabular array and item_id is the foreign central. This is known every bit inverse relation in Laravel.
Migration of ItemDetails Table
Get to the database/migration folder and open the migration file for itemdetails. You lot will see the default structure that include id , proper name . timestamps.
<?php utilize Illuminate\Support\Facades\Schema; utilise Illuminate\Database\Schema\Design; use Illuminate\Database\Migrations\Migration; form CreateItemDetailsTable extends Migration { /** * Run the migrations. * * @return void */ public part upwardly() { Schema::create('item_details', function (Pattern $table) { $table->increments('id'); $table->integer('item_id')->unsigned(); $table->strange('item_id')->references('id')->on('items'); $table->cord('filename'); $table->timestamps(); }); } public function down() { Schema::drop('item_details'); } } ?> Next , In the app/Providers/AppServiceProvider.php file, the boot method set up a default string length:
utilize Illuminate\Support\Facades\Schema; public function boot() { Schema::defaultStringLength(191); } Database Configuration
In a Laravel powered app, database configuration is handled by two files: env and config/database.php. In my instance, I created a database with the name uploading. The Cloudways Database Managing director makes the entire process very piece of cake.
Next, run the following command in the terminal to create tables in the database:
php artisan migrate
Now, when you check the database, you will see that the tables have been created successfully.
You might also like: Connect Laravel with Firebase Real Fourth dimension Database
Prepare the Road
Route sets the application URL and the controller method for this URL. Routes are located in route/spider web.php and contains the following code:
Route::get('/multiuploads', '[email protected]'); Route::postal service('/multiuploads', '[email protected]'); Terminate Wasting Fourth dimension on Servers
Cloudways handle server management for you lot so yous can focus on creating great apps and keeping your clients happy.
Create the Controller
Next, create the Controller past using the following command:
php artisan brand:controller UploadController
Next, become to app/Http/Controller/UploadController and open up the Controller file. Add the following code to it:
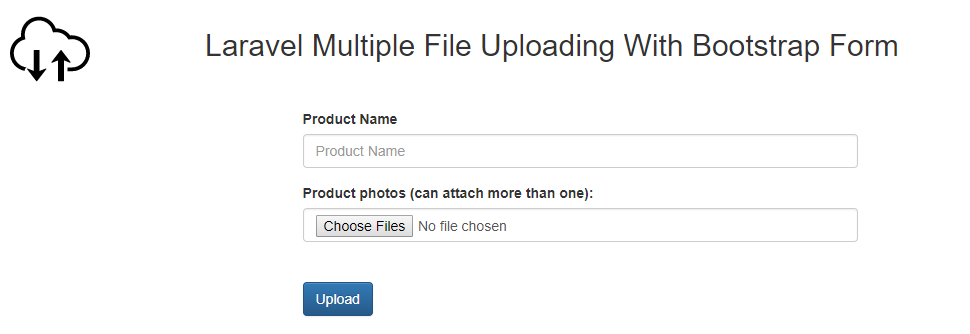
namespace App\Http\Controllers; employ Illuminate\Http\Asking; class UploadController extends Controller { public function uploadForm() { return view('upload_form'); } public function uploadSubmit(Request $asking) { // coding …. } } View File (Upload_form.bract.php)
In the view file, I have used Bootstrap for styling the code, link stylesheet , jQuery, JavaScript files.
<!doctype html> <html lang="{{ app()->getLocale() }}"> <caput> <meta charset="utf-8"> <meta http-equiv="X-UA-Compatible" content="IE=edge"> <meta proper name="viewport" content="width=device-width, initial-calibration=1"> <title>Laravel Uploading</title> <link rel="stylesheet" href="https://maxcdn.bootstrapcdn.com/bootstrap/3.3.7/css/bootstrap.min.css" integrity="sha384-BVYiiSIFeK1dGmJRAkycuHAHRg32OmUcww7on3RYdg4Va+PmSTsz/K68vbdEjh4u" crossorigin="anonymous"> <!-- Optional theme --> <link rel="stylesheet" href="https://maxcdn.bootstrapcdn.com/bootstrap/3.3.7/css/bootstrap-theme.min.css" integrity="sha384-rHyoN1iRsVXV4nD0JutlnGaslCJuC7uwjduW9SVrLvRYooPp2bWYgmgJQIXwl/Sp" crossorigin="anonymous"> <!-- Fonts --> <link href="https://fonts.googleapis.com/css?family unit=Raleway:100,600" rel="stylesheet" type="text/css"> <!-- Styles --> <style> .container { margin-superlative:2%; } </style> </caput> <body> @if (count($errors) > 0) <div course="alert alert-danger"> <ul> @foreach ($errors->all() as $error) <li>{{ $error }}</li> @endforeach </ul> </div> @endif <div course="container"> <div class="row"> <div form="col-md-2"> <img src="/32114.svg" width="80" /></div> <div class="col-physician-8"><h2>Laravel Multiple File Uploading With Bootstrap Form</h2> </div> </div> <br> <div class="row"> <div class="col-physician-three"></div> <div class="col-md-half-dozen"> <form action="/multiuploads" method="post" enctype="multipart/course-data"> {{ csrf_field() }} <div course="form-group"> <label for="Production Name">Production Name</label> <input type="text" name="name" class="form-command" placeholder="Product Name" > </div> <label for="Product Name">Product photos (can attach more than than one):</label> <br /> <input type="file" class="class-control" proper name="photos[]" multiple /> <br /><br /> <input type="submit" class="btn btn-primary" value="Upload" /> </course> </div> </div> </div> </trunk> </html> Controller with Validation
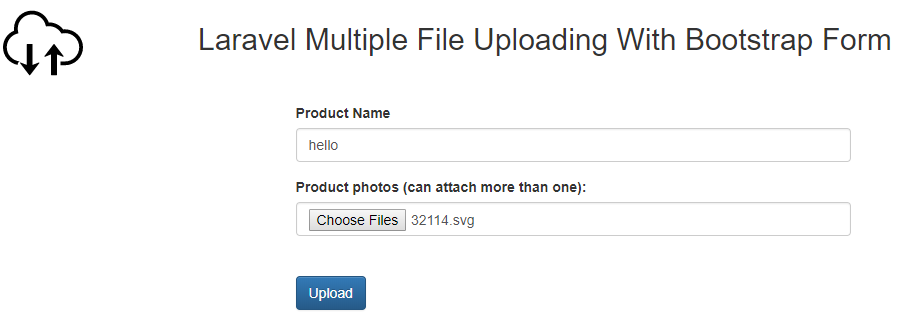
I have apply Bootstrap classes for showing the alarm for validation and use Laravel Validation methods to validate the blazon of file. Apply the following lawmaking for the controller:
<?php namespace App\Http\Controllers; utilise App\Detail; apply App\ItemDetail; utilize Illuminate\Http\Request; class UploadController extends Controller { public role uploadForm() { return view('upload_form'); } public part uploadSubmit(Request $request) { $this->validate($request, [ 'proper noun' => 'required', 'photos'=>'required', ]); if($request->hasFile('photos')) { $allowedfileExtension=['pdf','jpg','png','docx']; $files = $request->file('photos'); foreach($files every bit $file){ $filename = $file->getClientOriginalName(); $extension = $file->getClientOriginalExtension(); $cheque=in_array($extension,$allowedfileExtension); //dd($check); if($cheque) { $items= Item::create($request->all()); foreach ($request->photos every bit $photo) { $filename = $photo->store('photos'); ItemDetail::create([ 'item_id' => $items->id, 'filename' => $filename ]); } echo "Upload Successfully"; } else { echo '<div form="alarm alert-alarm"><stiff>Alert!</potent> Deplorable But Upload png , jpg , dr.</div>'; } } } } }?> Storing Data and Files in Laravel
Laravel provides a storage filesystem that stores all the information including files and images.
For this, Laravel provides config/filesystems.php, located in the config folder. In this file, yous can specify the locations for your file storage.
return [ 'default' => 'local', 'disks' => [ 'local' => [ 'driver' => 'local', 'root' => storage_path('app'), ], // ... Using the above code snippet, you could salvage the files in app/storage binder instead of the public folder. This is a good coding practice for storing data because this location is inaccessible from the browser. For the purpose of this tutorial, I have created a folder with the name photos in storage/app/.
When the run the app in the browser, you will see the following screens:
With Validation
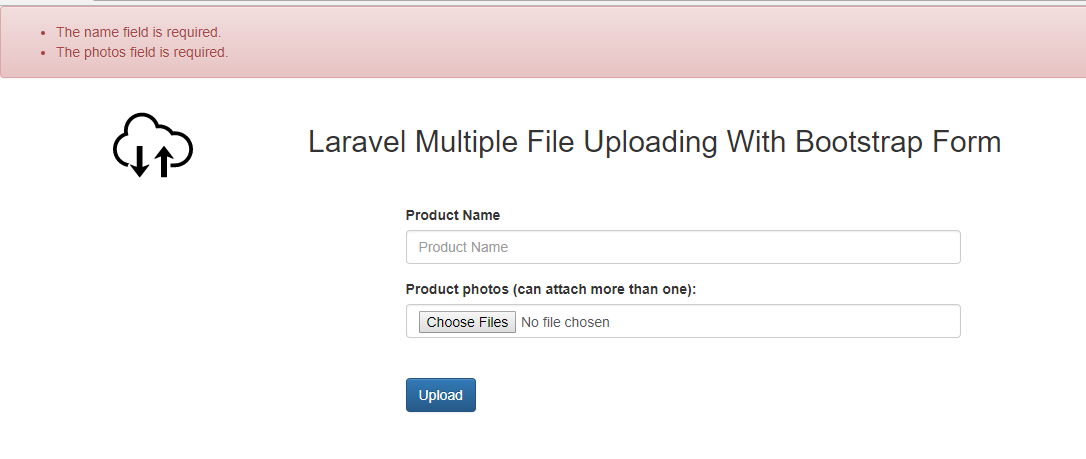

To see the image and file upload in Laravel in action, check out the demo.
Difference Between Local and Public Disks
Y'all tin can run across the disks local and public divers in config/filesystems.php. Laravel uses the local disk configuration by default. The underlying difference between local and public disk is that local deejay is private and can't be accessed from the browser, whereas the public disk tin can be easily accessed from the browser.
Since the public disk is in storage/app/public and Laravel'south server root is in public, you demand to link storage/app/public to Laravel's public binder. We can practise past running php artisan storage:link.
Manipulating files
Laravel largely needs external help in resizing images, adding filters and other related operations. Adding these feature to the native environs of Laravel will only bloat the application since there isn't any installs needed. For that, we need a package called intervention/image. Earlier to a higher place, we have already installed this package, merely nevertheless composer requires it for reference.
Nosotros don't need to annals anything since Laravel can automatically detect packages. Read the following if you are using lesser version than Laravel v.v.
To resize an paradigm
$image = Prototype::make(storage_path('app/public/profile.jpg'))->resize(300, 200); Even Laravel's packages are fluent.
Sending Files equally Email Attachments
For transport files with attachments you lot just paste the following code in your controller according to input fields.
<?php ... ... public function uploadDocument(Request $asking) { $title = $asking->file('proper noun'); // Get the uploades file with name document $certificate = $request->file('document'); // Required validation $request->validate([ 'name' => 'required|max:255', 'document' => 'required' ]); // Check if uploaded file size was greater than // maximum immune file size if ($document->getError() == 1) { $max_size = $document->getMaxFileSize() / 1024 / 1024; // Become size in Mb $error = 'The document size must exist less than ' . $max_size . 'Mb.'; render redirect()->back()->with('flash_danger', $mistake); } $information = [ 'document' => $certificate ]; // If upload was successful // transport the electronic mail $to_email = [email protected]; \Mail::to($to_email)->transport(new \App\Mail\Upload($information)); return redirect()->back()->with('flash_success', 'Your document has been uploaded.'); } Create email sender class
To ship the email in Laravel, you need to create a separate form file. This class will have the functionality to prepare e-mail and its body. Too nosotros will attach the uploaded file as inline attachment.
Hither is my email form:
<?php #App\Mail\Upload.php namespace App\Mail; employ Illuminate\Bus\Queueable; use Illuminate\Mail service\Mailable; employ Illuminate\Queue\SerializesModels; course Upload extends Mailable { apply Queueable, SerializesModels; protected $data; /** * Create a new message case. * * @return void */ public function __construct($information=[]) { $this->data = $data; } /** * Build the message. * * @return $this */ public function build() { render $this->view('emails/upload') ->bailiwick('Certificate Upload') ->attach($this->information['document']->getRealPath(), [ 'every bit' => $this->information['document']->getClientOriginalName(), 'mime' => $this->data['document']->getClientMimeType(), ]); } } The of import functions used hither are:
– getRealPath(): Go the temporary upload path – getClientOriginalName(): Get the name of uploaded file – getClientMimeType(): Go the mime type of uploaded file
Create the e-mail template
In the to a higher place step, our email grade refers to the electronic mail template as render $this->view('emails/upload'). So nosotros will create the e-mail template at resources/views/emails/upload.blade.php
#resources/views/emails/upload.blade.php <p>Hi,</p> <p>Please download the attached file.</p> <p>Thanks</p>
Now when you submit the grade, your uploaded file will exist sent an electronic mail attachment.
Share your stance in the annotate section. COMMENT Now
Share This Article
Customer Review at ![]()
"Cloudways hosting has one of the all-time customer service and hosting speed"
Sanjit C [Website Programmer]
Pardeep Kumar
Pardeep is a PHP Community Manager at Cloudways - A Managed PHP Hosting Platform. He dear to piece of work on Open up source platform , Frameworks and working on new ideas. You lot tin can email him at [email protected]
Source: https://www.cloudways.com/blog/laravel-multiple-files-images-upload/
0 Response to "The File Failed to Upload. Laravel Larger"
Postar um comentário